• Skip to primary navigation
  • Skip to header navigation
  • Skip to main content
  • Skip to primary sidebar

RecipeTin Eats

Fast Prep, Big Flavours

  • My RecipeTin
  • NEW cookbook!
  • Recipes
  • Recipes By Category
    • Iconic + cult classics
    • Mains
      • Chicken
        • Chicken mince
      • Beef Recipes
        • Ground Beef (Mince)
      • Pork
      • Lamb
      • Turkey
      • Shrimp / Prawns
      • Salmon
      • Fish recipes
      • Salad Meals
    • Quick and Easy
    • Soups
    • One Pot – One Pan
    • Stewy slow-cooked things
    • Slow Cooker
    • Sides
      • All
      • Salads & veg
      • Show Off Salads
      • Rice (all)
      • Fried rice recipes
      • Rice (plain)
      • Potato
    • Pasta
      • All
      • Pasta bakes
      • Pasta salads
    • Sweet
      • Cakes
      • Candy
      • Cheesecakes
      • Cupcakes & Muffins
      • Cookies
      • Puddings & Cosy Desserts
      • Bite Size
      • Pies
      • Slices & Bars
      • Frosting & Icing
      • Ice cream
    • Cuisine
      • Asian
        • All
        • Stir fries
        • Noodles
        • Soups
        • Chinese
        • RecipeTin Japan 🇯🇵
        • Korean
        • Modern Asian
        • Thai
        • Vietnamese
      • French
      • Greek
      • Indian
      • Italian
      • Mediterranean
      • Mexican
      • Middle Eastern
      • South American
    • Dietary
      • Gluten Free
      • Low Calorie
      • Vegetarian
    • Other Categories
      • BBQ
      • Breakfast
      • Burgers
      • 🎄Christmas
      • Cocktails
      • Party Foods
      • Rice Recipes
      • Roasts
      • Sandwiches & Sliders
    • Recipe collections
    • Cookbook recipes
  • My Food Bank
  • About
    • Me
    • RecipeTin Meals
    • My Cookbooks
      • Tonight (NEW!)
      • Dinner
    • Free Recipe Books
    • Contact
    • Nitty Gritty
      • Policy: Use of Recipes & Images
      • Privacy & Disclosure
Home Baking

Soft No Knead Dinner Rolls

By Nagi Maehashi
1,832 Comments
Share
  • Copy Link
  • E-mail
  • Facebook
  • WhatsApp
Published5 Apr '17 Updated21 Jun '25
Jump to
Recipe

No stand mixer, no knead, no special equipment required. These No Knead Dinner Rolls are perfectly soft and fluffy and are astonishingly effortless to make. Just combine the ingredients in a bowl and mix with a wooden spoon – that’s it! It’s the easiest recipe for bread rolls in the whole world!
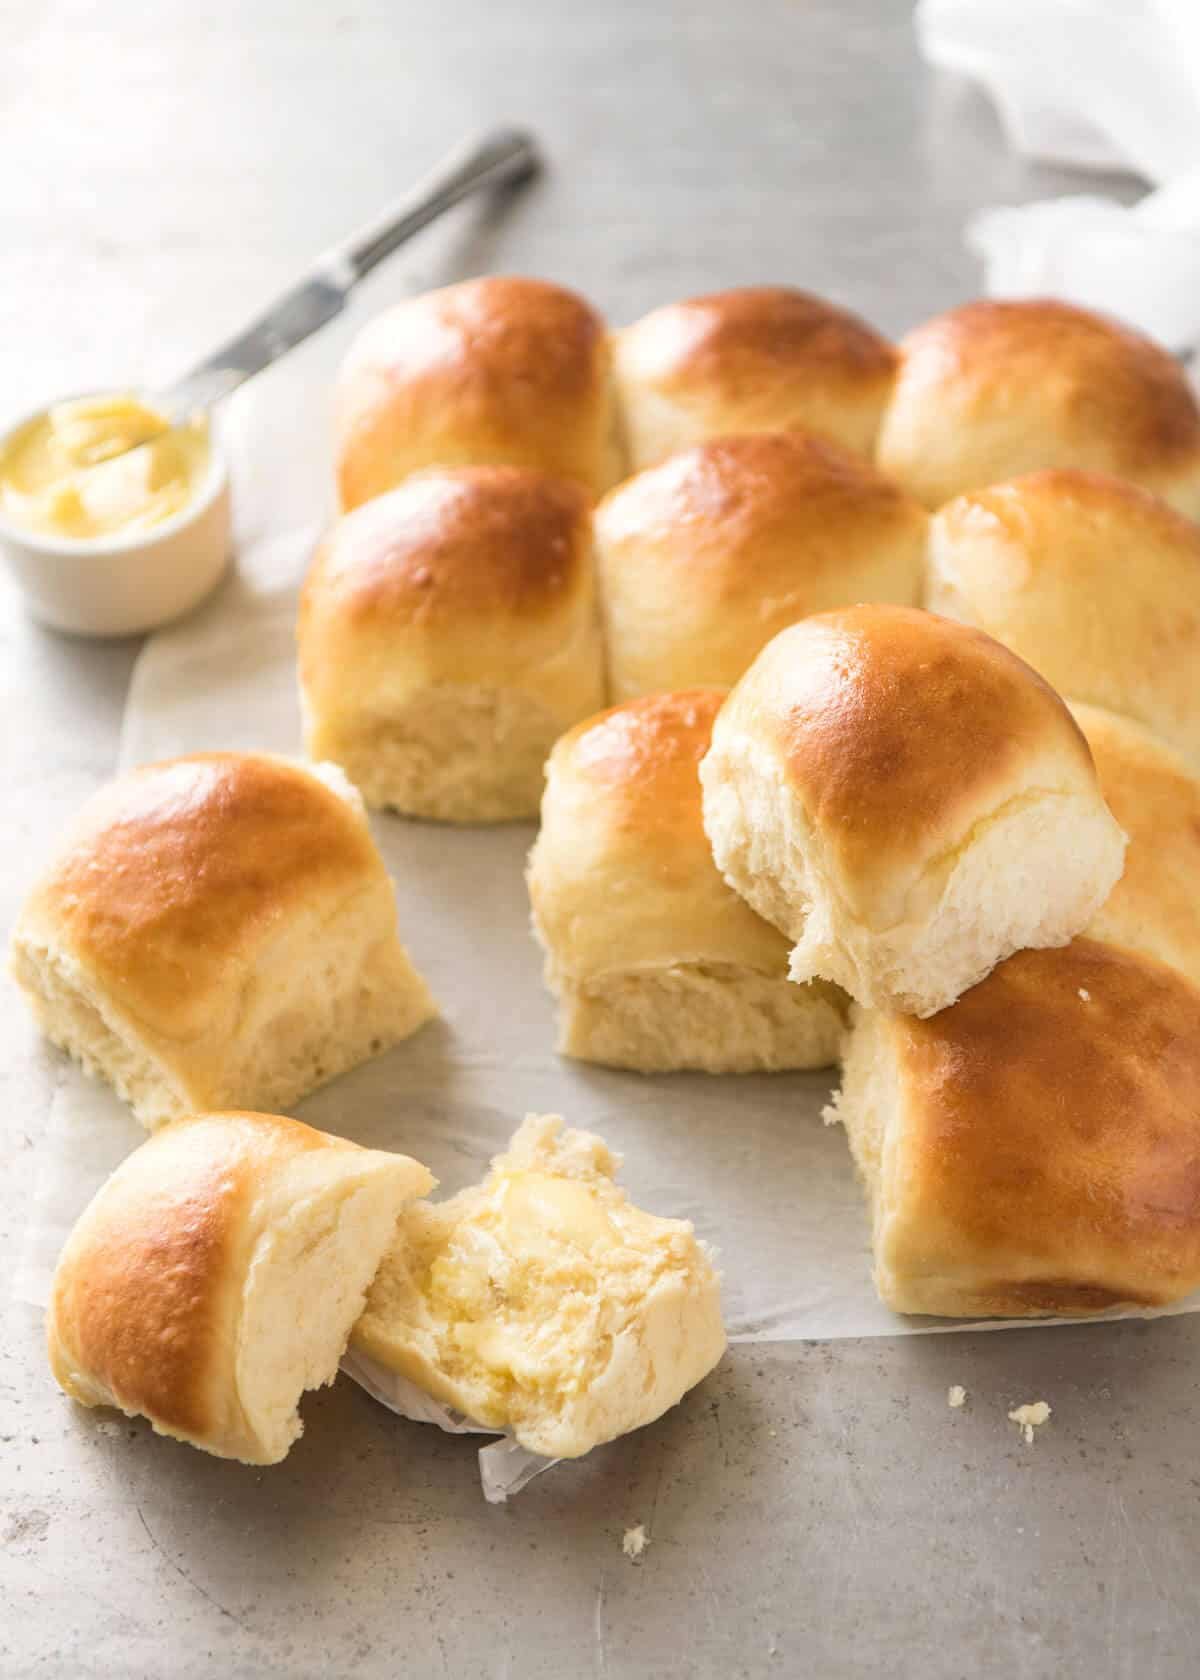
Soft no knead dinner rolls, fresh out of the oven, ready to be eaten.

This recipe for bread rolls will blow your mind!

These dinner rolls are:

  • made without kneading;

  • without a stand mixer or any other electric appliance;

  • take 2 minutes of active effort to mix the dough;

  • have golden tops and are soft and fluffy on the inside.

Every single time I make these, I am in utter awe of how effortless they are, and how amazing they taste. They are in every way just as good as classic dinner rolls, made by kneading the dough by hand (tired arms, tired arms!) or using a stand mixer.

I truly believe to my very core that only those with a refined palette and/or baking experts can tell the difference between these No Knead Dinner Rolls and traditional kneaded-tired-arms dinner rolls!
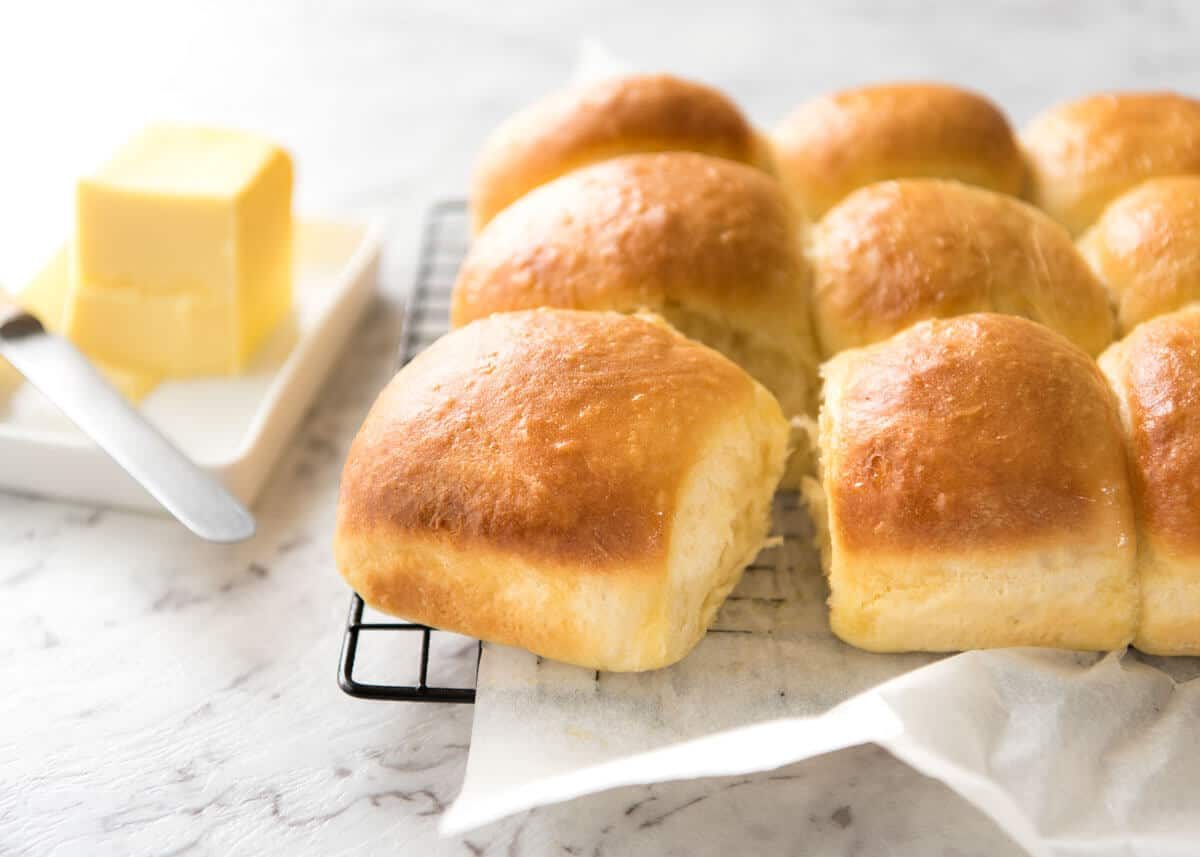
Soft no knead dinner rolls on a rack, fresh out of the oven, ready to be eaten.

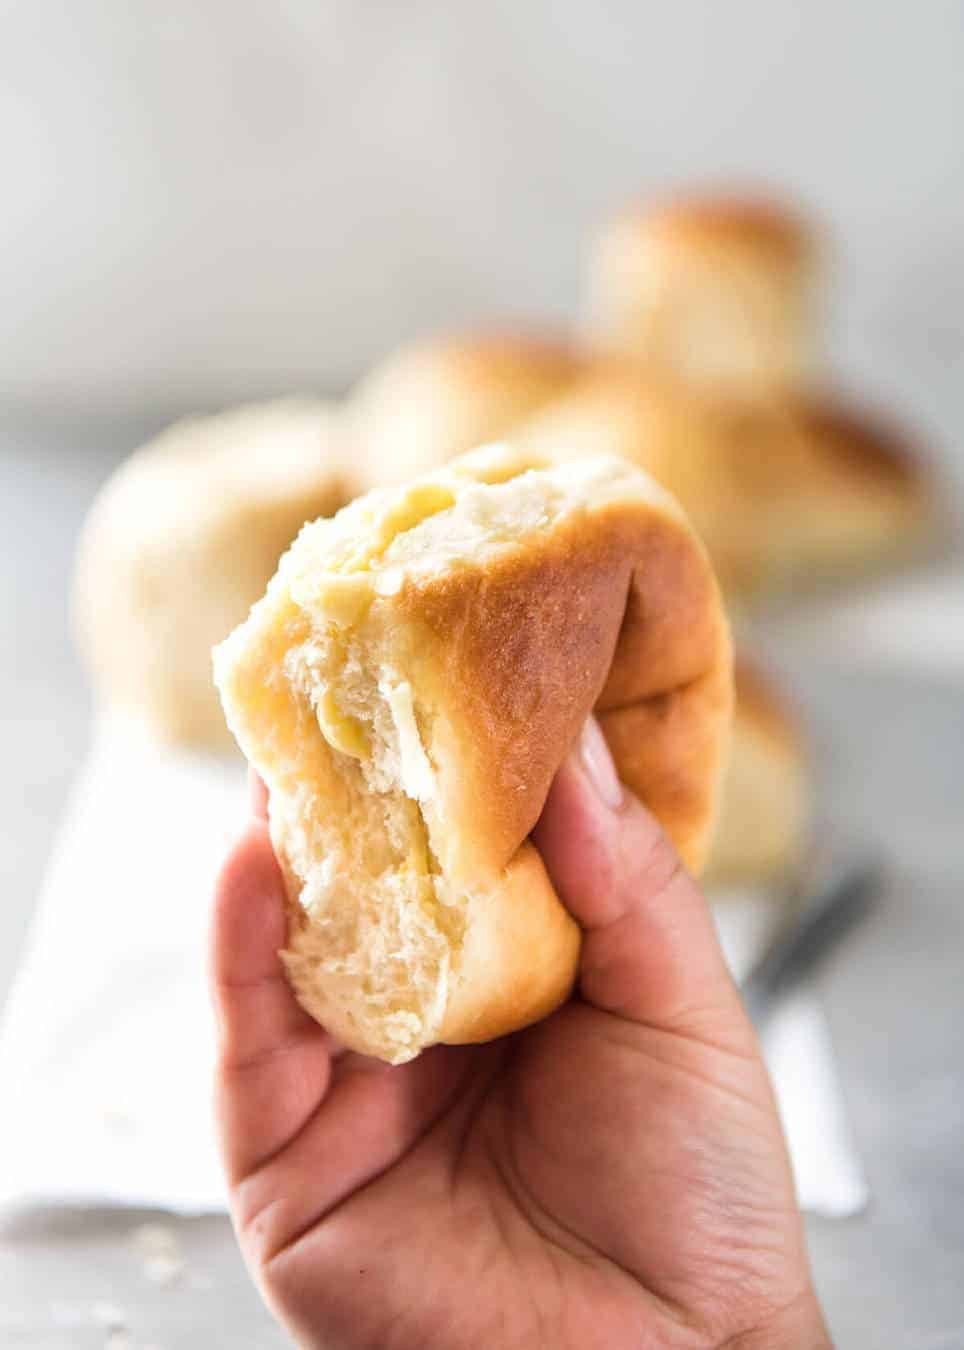
See how soft and fluffy they are??

Hand squeezing no knead dinner rolls to show how soft and fluffy they are.

Kneaded vs No Knead Dinner Rolls

In the interest of being completely open and honest, here are the differences that I notice between kneaded dinner rolls and these No Knead Dinner Rolls:

  1. The kneaded rolls stay a wee bit more moist for longer. ie. they are slightly better the next day compared to the No Knead ones. But actually, homemade bread, muffins etc, being preservative free that they are, are always best consumed fresh so I don’t see this as a major disadvantage. Neither the kneaded nor No Knead rolls are great the next day. They lose their moisture and both need to be warmed up before serving to make them moist again. It is just that with the kneaded ones you could possibly get away with not warming up (but they aren’t great), whereas the No Knead ones definitely need warming up;

  2. Kneaded rolls rise a wee bit more. Not noticeable for normal people, and you’d never say the No Knead ones aren’t soft and fluffy. They are, they really are. It’s just that the kneaded ones rise a touch more with the same amount of yeast.

I’m so convinced of the merits of no-knead breads however, that I have since posted No-knead Artisan Bread and Focaccia – both spectacular loaves in their own right that don’t require single minute of kneading!
These No Knead Dinner Rolls are like magic! Astonishingly easy, no stand mixer, just mix the ingredients in a bowl! recipetineats.com

Dump-and-mix NO KNEAD Dough

In terms of the prep, the batter is literally a dump-and-mix job. There is a major difference in rise time compared to kneaded dough which can rise in 30 – 45 minutes for the 1st rise, then around the same for the 2nd rise after forming the rolls. For these No Knead Dinner Rolls, the dough is much wetter than kneaded dough, so it takes longer to rise. 1.5 – 2 hours, depending on how warm it is where you are. If you use my ridiculous-but-effective tip of rising the dough in your (empty! warm!) dryer, it takes 1.5 hours. 🙂 (See recipes notes for details)

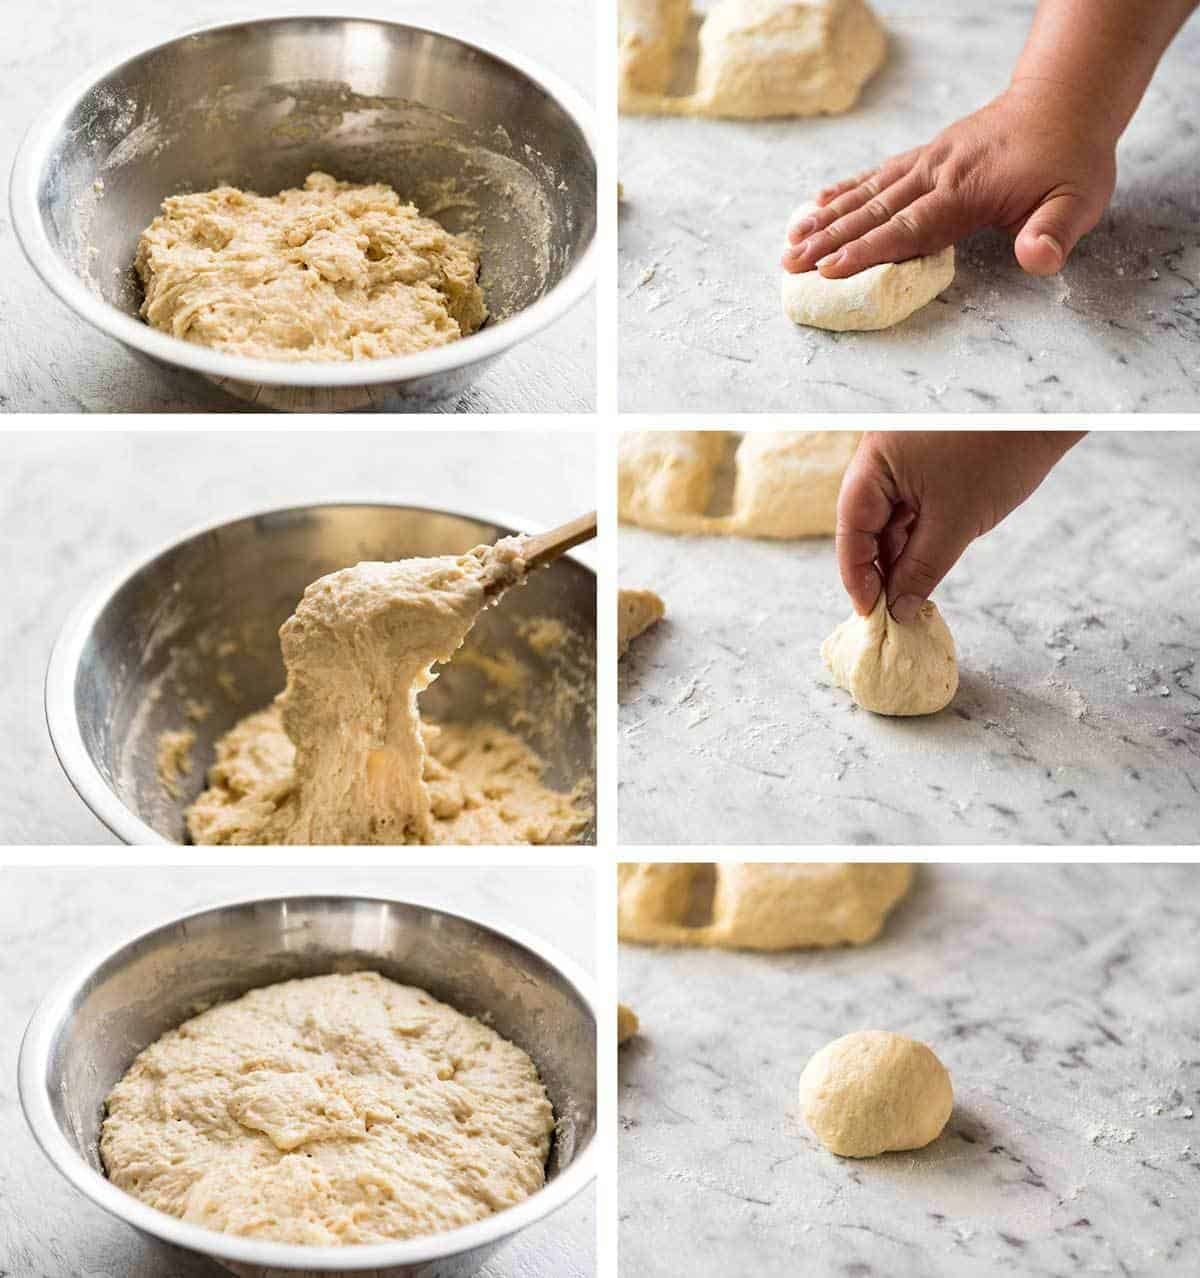
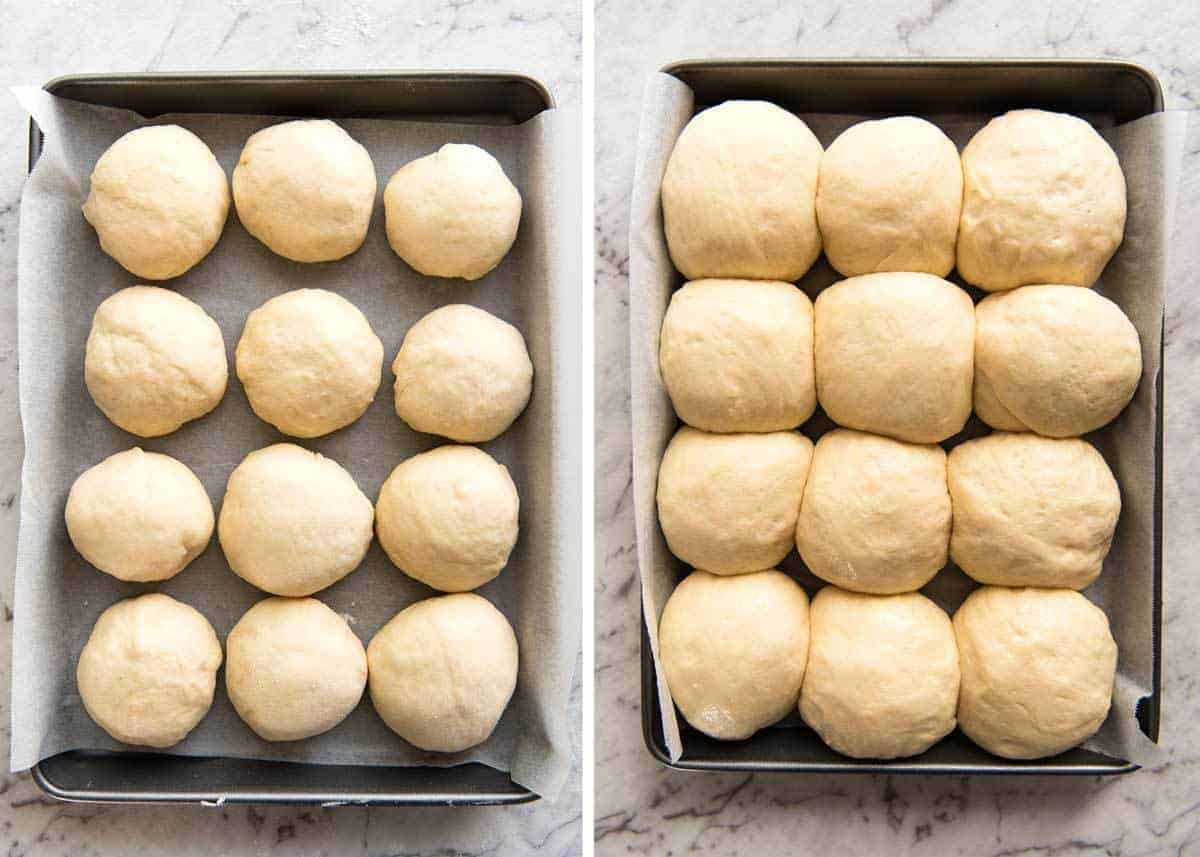
You can see in these photos how different the dough is compared to traditional bread dough. It’s not knead-able, it’s way too sticky. It’s almost more like a muffin batter!

Quick little tip: To get a beautiful golden surface, the dough needs to be rolled tightly and smoothly into balls. With sticky dough, this is tough to do. So here’s my work around: Press the dough down lightly, then bundle it up like a money-bag (mmm…Thai Money Bags…). Flip it over and you have a nice smooth surface with the dough stretched tightly = smooth golden surface. I demo this in the recipe video too (below recipe).
These No Knead Dinner Rolls are like magic! Astonishingly easy, no stand mixer, just mix the ingredients in a bowl! recipetineats.com

Make-ahead and bake on demand

Another big bonus for these rolls: you can roll the dough into rolls then refrigerate overnight (uncooked) and bake them fresh when you’re ready to serve! It’s quite amazing actually, I wasn’t sure it would work but it does.

Easter is coming up! That’s why I decided to squeeze these in so soon after sharing Hot Cross Buns (which you can make using this No Knead technique, the recipe is in that post). I know some people think baking with yeast is daunting. But I swear to you, watch the video. See how soft and irresistible these rolls come out. And be prepared to be blown away by how easy these are to make!

Carb Monsters unite! – Nagi xx
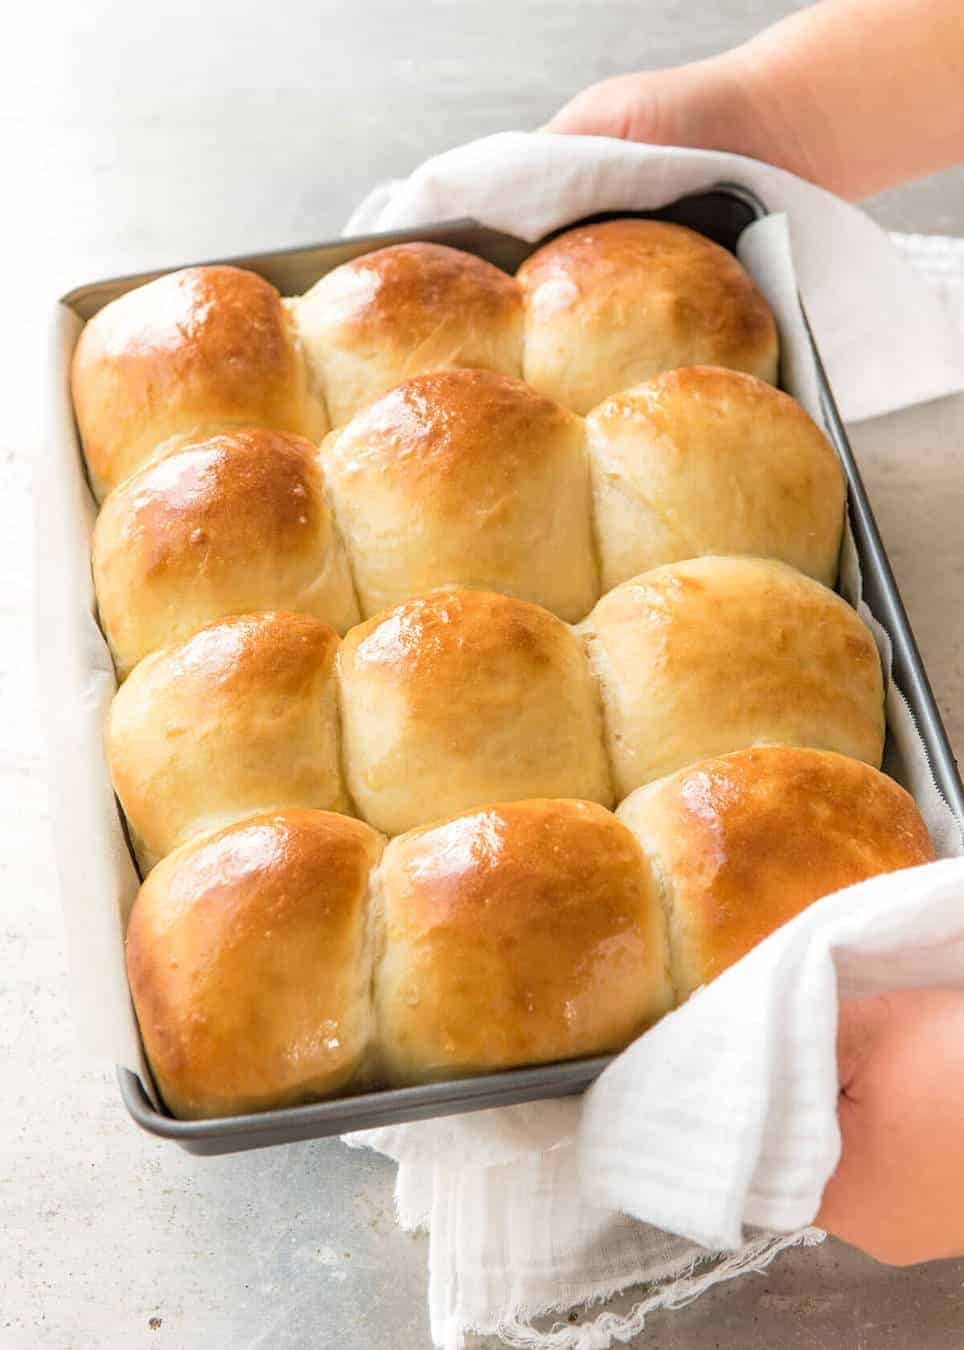
Soft no knead dinner rolls in a baking pan, fresh out of the oven.

More No Knead Breads & Flavour variation options!

  • No Knead Cinnamon Rolls

  • No Knead Hot Cross Buns

  • Irish Soda Bread

  • Cheese and Bacon Rolls (use this no knead dough for that recipe)


WATCH HOW TO MAKE IT

No Knead Dinner Rolls recipe video! No laughing at the Baby Hands – you’ll cop a serious eyeful in this video!

Hungry for more? Subscribe to my newsletter and follow along on Facebook, Pinterest and Instagram for all of the latest updates.
These No Knead Dinner Rolls are like magic! Astonishingly easy, no stand mixer, just mix the ingredients in a bowl! recipetineats.com

SOFT NO KNEAD Dinner Rolls

Author: Nagi
Prep: 10 minutes mins
Cook: 15 minutes mins
Total: 25 minutes mins
Side
Western
4.97 from 501 votes
Servings12
Tap or hover to scale
Print
  • 45845
Recipe video above. These soft dinner rolls are like magic! Just mix the ingredients in a bowl – no kneading, no stand mixer, no special ingredients required. These are soft, fluffy and moist, nicely salted with a touch of sweet. This requires 2 hrs 15 minutes+ rise time. 

Ingredients

Buns:

  • 1 tbsp dry yeast (Note 1)
  • 1/4 cup caster/superfine sugar , or sub with normal white sugar
  • 1/2 cup warm water (Note 2)
  • 4 cups bread flour + extra for dusting (Note 3)
  • 1 1/2 tsp salt , cooking/kosher salt
  • 1 cup milk, lukewarm, whole or low fat, (Note 2)
  • 50g / 3 1/2 tbsp unsalted butter , melted and cooled
  • 2 eggs , at room temperature, beaten with fork

Brushing:

  • 1 tbsp butter , melted
Prevent screen from sleeping

Instructions

  • Place the yeast and 2 teaspoons of the sugar in a medium bowl, then pour in water. Leave for 5 minutes until it froths.
  • Place flour, remaining sugar and salt in a bowl. Mix to combine.
  • Make a well in the centre. Add milk, butter, eggs and pour in the yeast liquid, including all froth.
  • Mix until combined with wooden spoon – it will be like a thick muffin batter. Not pourable, but thick and sticky.

Rise #1:

  • Leave dough in the bowl, cover with a wet (clean) tea towel and place in a warm place (25C/77F+) to rise for around 1 1/2 – 2 hours or until almost tripled in volume. See Note 4 for how I do this (you will laugh – but it works every time!). Dough surface should be bubbly (see video or photos in post).

Forming Balls (watch video, it’s helpful):

  • Line a 31.5 x 23.5 cm / 9 x 13″ tray with baking paper with overhang.
  • Remove tea towel and punch dough to deflate, then mix briefly in the bowl to get rid of the bubbles in the dough.
  • Dust work surface with flour, scrape dough on work surface. Dust top of dough then shape into a log. Cut log into 4 pieces, then cut each piece into 3 pieces (12 in total). 
  • Take one piece and press down with palm, then use your fingers to gather into a ball, flip (so smooth side is up) then roll the dough briefly to form a ball. This stretches the dough on one side and that’s how I get a nice smooth surface on my roll. (For this step, use as much flour as needed to handle dough and avoid piercing inside into the wet dough)
  • Place the ball with the smooth side up on the tray. Repeat with remaining dough. Line them up 3 x 4.

Rise # 2:

  • Spray surface of rolls (or cling wrap) with oil (any), then place cling wrap over the tray.
  • Return tray to warm place and leave for 30 – 45 min, until the dough has risen by about 75% (less than double in size).
  • Partway through Rise #2, preheat oven to 200C/390F (standard) or 180C/350F (fan/convection).
  • Bake for 15 – 18 minutes, or until the surface is a golden brown and the roll in the centre sounds hollow when tapped. The surface colour is the best test for this recipe.
  • Remove rolls from oven. Brush with melted butter.
  • Use overhang to lift rolls onto a cooling rack. Allow to cool to warm before serving.

Recipe Notes:
1. 1 tbsp dry yeast = 9 grams. I use Lowan Dried Instant Yeast (red tube, sold at Woolies/Coles baking aisle) which technically doesn’t need to be frothed before using but there’s no harm in doing it, and I do it out of habit + also because then the same steps apply to any dried yeast.
If you are using the packets, you can just use 2 x 7 g sachets, that is 4 1/2 tsp which is slightly more than 1 tablespoon but it works just fine. Doesn’t taste yeasty and makes it rise a touch more. Otherwise, measure out 1 tablespoon.
If your yeast doesn’t go frothy, sorry to say it’s not active so your buns won’t rise. 
To use fresh yeast (comes in a block that crumbles, not powder like dry yeast), use 27g/ 0.9 oz. You don’t actually need to dissolve it in liquid like I do with the dry, but there’s no harm in doing it and so for the sake of consistency, crumble it in and let stand until it foams up, same as using dry yeast.
2. Scalding hot milk and hot water kills the yeast. I heat milk for 45 seconds on high in the microwave, and use warm tap water. The test is this: stick your finger in. If it was a bath, would it be pleasant? Good. It’s not too hot or too cold!
3. Breads are fluffier and slightly more tender if made with bread flour rather than normal flour (plain or all purpose). However, this recipe works great with normal white flour too.
Cups around the world differ in size. If you don’t have scales to weight the flour, please use the relevant cup size. For US/Canada, use 4 1/2 cups (they are slightly different, but close enough). For rest of world other than Japan, use 4 cups of flour. For Japan, please weigh the flour.
4. WARM PLACE for dough: This is what I do all year round – use my dryer. Laugh – but try it! Run the (empty) dryer for 1 – 2 minutes, then place the bowl inside. If you do that, the dough will rise in 1.5 hours. Even if it’s snowing outside!
5. SUGAR: This is not a sweet roll (I’d use 1/2 cup+ for that) but there is a touch of sweet. 1/4 cup of sugar across 12 rolls = 1 tsp per roll. You can reduce it to 2 tablespoons of sugar.
6a. MAKE AHEAD: Follow recipe up to rolling balls and cover with cling wrap. Then refrigerate for 4 hours – 24 hours (this is the 2nd rise), take them out 30 minutes before then bake!
6b. STORING: As with all homemade bread, it is best served on the day it’s made. Things made using this No-Knead version doesn’t keep as well as the kneaded version – dries out more. For the day after, reheating makes all the difference to make them soft and moist again – 15 sec in the microwave! These freeze great cooked, then just defrost. The dough can be frozen too but it won’t rise as well (but still fluffy). To reheat batches, I pop them on a tray and cover with foil (to avoid the surface getting too crisp), then reheat at 160C/320F for 8 minutes or so. Or cut in half and toast.
6c. DOUBLING: Make double the batter in one large bowl, then divide the batter into 2 bowls for the first rise (if double the dough is in one giant bowl, may struggle to rise). Proceed with recipe and place rolls on a large tray or 2 trays, and bake them all on the same shelf in the oven.
6d. EXTREME HUMIDITY (eg. South East Asia) can make the dough stickier after the 1st rise and makes it a bit harder to form into balls. Just be generous sprinkling with flour with forming into log, cutting, rolling into balls – don’t knead the flour in, use it on the surface for handling purposes only. The dough is stickier than usual kneaded dough, so the technique I demo in the video to make the rolls is specifically to minimise making contact with the sticky dough.
7. SOURCE: This recipe is adapted from various no-knead bread recipes I’ve come across over the years. I probably first saw it on Martha Stewart or New York Times. The recipe has been tweaked and now I firmly consider this version to be “mine”! 🙂 
8. HIGH ALTITUDE: Multiple readers have now reported that this recipe worked out great! Also, varying reports on the dough seeming too dry or too wet then adjusted with more flour compared to that demonstrated in the video have all also worked out fine, proving that this recipe is actually very forgiving!
9. GLUTEN FREE: This also works with gluten free flour, though the rolls are not quite as fluffy as is usually the case when substituting GF flour. However, they are still definitely fluffy! I think you’ll be amazed how well these turn out!
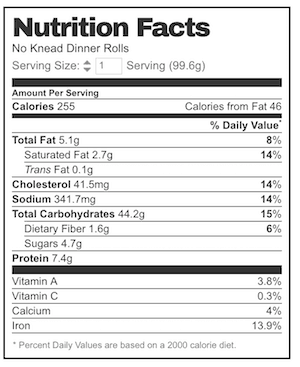
10. No Knead Dinner Rolls nutrition per roll. This makes 12 fairly large rolls, about the size of a baseball.

Nutrition Information:

Serving: 99.6gCalories: 255cal (13%)
Keywords: Soft no knead dinner rolls
Did you make this recipe?I love hearing how you went with my recipes! Tag me on Instagram at @recipe_tin.

LIFE OF DOZER

When he got sent to the naughty corner and he was wondering whether he was allowed back in….

Dozer the golden retriever peeking inside, wondering if he is allowed back in

Dozer was my beautiful dog and faithful companion for 14 years. He was also official taste-tester of RecipeTin Eats, and filled every day with joy, mischief and laughs. He passed away in February 2026. I miss him every day. The Life Of Dozer section shares the happiest moments of his life and keeps his memory alive. Read more about him here.

In loving memory of Dozer

2012 – 2026


Previous Post
Custard (Creme Anglaise)
Next Post
Cured Salmon Gravlax (crazy easy!)

Hi, I'm Nagi!

I believe you can make great food with everyday ingredients even if you’re short on time and cost conscious. You just need to cook clever and get creative!

Read More

Free Recipe eBooks

Join my free email list to receive THREE free cookbooks!

Reader Interactions

Leave a Comment Cancel reply

Your email address will not be published. Required fields are marked *

Cooked this? Rate this recipe!


1,832 Comments

  1. Rae says

    April 22, 2017 at 9:09 am

    Can you half the recipe?

    Reply
    • Nagi says

      April 23, 2017 at 7:58 pm

      Yep! Use the scaler – hover over servings 🙂

      Reply
  2. Velvet says

    April 22, 2017 at 1:14 am

    5 stars
    The first time I made, I only used one pack of dry yeast and regular all purpose flour. Because I didn’t look at foot note. Came out good but not like I expected.

    The second time, I used bread flour and two packs of yeast and they came out perfect

    Reply
    • Nagi says

      April 23, 2017 at 7:53 pm

      That’s so fantastic to hear Velvet! Thank you for letting me know you enjoyed it! – N xx

      Reply
  3. Kiana says

    April 21, 2017 at 9:59 am

    Can’t wait to try these!!!! Oh and you should say your #1 deserted island item is buttered bread. It will confuse them from grumbling

    Reply
    • Nagi says

      April 23, 2017 at 7:39 pm

      THAT’S BRILLIANT!!!! Definitely pulling that out next time! ?

      Reply
  4. Anna Nielsen says

    April 20, 2017 at 11:59 pm

    5 stars
    Amazing! Even if you have never baked a thing in your life you could make these!

    Reply
    • Nagi says

      April 21, 2017 at 7:29 am

      YESSSS!!!

      Reply
  5. Megan says

    April 20, 2017 at 11:09 am

    Hi! I just made these for the first time and they are delicious but despite being brown on top and sounding hollow they are still doughy inside. The color was on the verge of too dark so I took them out at 15 minutes. I see you used a square metal pan and all I had was an 8×8 glass. Could this be my problem? Any thoughts would be greatly appreciated. Thanks!

    Reply
    • Gracie says

      April 21, 2017 at 4:22 am

      4 stars
      Yes, cooking varies with the pan, glass, non-stick, etc, that you use with any food. Also, not all ovens cook exactly the same so for time and degree.

      Reply
      • Gracie says

        April 21, 2017 at 4:46 am

        I just had to say these look amazing I can just imagine the wonderful fresh taste!

        >>>”…top 3 foods they would take to a Deserted Island to live on forever. You do not have to worry about nutrition and no one puts on weight on my island. And despite much pressure, I stand firm that you are unable to grow, catch or kill anything on this island. You can, however, trade foods with other people on your island.”<<<

        If we could take it with us to live on forever that would mean we would have a lifetime supply so we wouldn't need to grow, catch or kill anything so that point is null. Lol.
        So, in playing the game I would definitely gave a lifetime supply of these fresh baked buns! Bread is filling!
        Second would be some chocolate! Have to have chocolate!! Lastly I would bring pizza! Yes, I know, more dough! Lol.?
        You didn't mention beverages, but my lifetime supply would of course be water. If someone else had the "good drinks" we could always trade! 😉
        Ha ha that was fun!
        Now what would you like to trade with me, if anything? Lol.?

        Reply
        • Nagi says

          April 21, 2017 at 7:30 am

          YESSS!!! COME ON MY ISLAND!!!!

          Reply
    • Nagi says

      April 21, 2017 at 7:22 am

      Hi Megan – I’ve made rolls in glass before and they worked just fine. Did you use the right temp for the oven type you have? If your oven runs hot, try turning it down a touch, these rolls can take a slightly lower temp!

      Reply
  6. Diana Spragg says

    April 20, 2017 at 6:59 am

    Ever tried these with gluten free flour?

    Reply
    • Nagi says

      April 21, 2017 at 7:08 am

      I’m sorry, I haven’t, I would love to know if you try!

      Reply
  7. Patty mcahren says

    April 20, 2017 at 3:55 am

    I don’t think this recipe is going to work for me :(. It wasn’t wet like in the video. I followed the recipe to a tea. I’m not sure why but I’ve never been able to make bread. Sadly this may be my last attempt..

    Reply
    • Nagi says

      April 21, 2017 at 7:04 am

      Hi Patty, I’m sorry to hear that. Are you sure you measured the ingredients correctly?? I can’t imagine what could make the batter so different, even readers in high altitude places and super humid places have made this recipe with success! N xx

      Reply
  8. Nancy Wilson says

    April 20, 2017 at 2:37 am

    5 stars
    Reporting back on my first batch of these rolls. I have never made yeast breads before (intimidating) but these were easy and turned out well. I would definitely suggest weighing your flour instead of measuring. More precise. I made one batch as you did and the second batch went into the refrigerator for the first rise over nite. I took them out in the am and made smaller ones for dinner rolls. 9 in a square aluminum pan. They rose on the counter and were ready to bake at noon and were the perfect size. So I got 18 rolls out of this recipe. My 18 year old granddaughter was inspired to try it. Her turn next time.

    Question – do you have a easy pizza dough recipe? I would love to do pizza on the grill this summer

    Reply
    • Nagi says

      April 21, 2017 at 7:01 am

      Whoo! So pleased to hear that Nancy!! I am actually working on a bunch of recipes using this one as a base, and pizza dough is among them! I made naan using a variation of this recipe the other day and it worked great, made me think pizza will work too. Think using olive oil will go some way to make it crispy!

      Reply
  9. Nandi Csincsi says

    April 19, 2017 at 9:32 pm

    I made these earlier because I was going to make sticky drumstick in plum sauce later. They looked so nice to be honest I couldn’t belive that I made them. My husband couldn’t wait for dinner he took 2 when they were still warm with butter and a cuppa. Later that evening when we were now eating dinner I warmed them and Nagi! Nagi ! another winner. I have tried other recipes before and yours I’ll rate 10 out of 5 if there’s a score like that, best rolls nice and soft even the folowing day. I am so happy about my cooking skills thanks to you Nagi xx

    Reply
    • Nagi says

      April 21, 2017 at 6:52 am

      Ohhhhh!!!!! I’m so happy you lied these Nandi!!! And I’m also glad you let your husband sneak some while they were still warm!! N xx

      Reply
  10. Joyce says

    April 19, 2017 at 1:24 pm

    5 stars
    Hi, Nagi! My recipe for no-knead bread is quite similar to yours except I use 4 oz unsalfed butter, I always sift the flour, and I always use jumbo eggs when I cook or bake. I have also made this recipe and baked it in a loaf pan. My husband and I owned and operated two B&Bs in Michigan, and alnost everything we offered I made from scratch. You are quite correct about its shelf life..always best eaten the day it’s baked. Thanks. Now I think I’ll make a loaf tomorrow? Joyce

    Reply
    • Nagi says

      April 21, 2017 at 6:45 am

      Ohhhh I love hearing that! making things like bread from scratch is the type of true B&B experience that you don’t see much anymore. ❤️

      Reply
  11. Margie WIlliams says

    April 19, 2017 at 11:48 am

    5 stars
    I’ve tired other no knead rolls before and they were never as fluffy as these. This recipe turned out very large and super fluffy with hardly any work. I’m just recovering from major abdominal surgery and wanted to bake something easy that wouldn’t make me to tired. This was perfect! I didn’t need to pull out my heavy mixer or get a workout kneading the dough. I made them today for dinner and my guys (husband and 2 grown boys) Loved them!

    And I love the dryer trick! Thank you for the tip! We have the Air Con running and they tripled in size in my dryer just like you said they would. Plus the boys thought it was funny when I told them I had bread in the dryer. LOL!

    BTW: I’m from the USA and used my dry measuring cups to measure the 4 1/2 cups and it was just perfect. You do have to spoon your flour into the cups. Don’t just scoop it up, or you could be short or to heavy with the amounts.

    PS, I bake for a living at a cake shop.

    Reply
    • Nagi says

      April 21, 2017 at 6:40 am

      Hi Margie – I hope you are recovering ok! 🙂 And extra pleased that these rolls turned out so great for you 🙂 N xx

      Reply
  12. Kym says

    April 19, 2017 at 1:51 am

    Hey there Nagi. Thankyou for this wonderful recipe! I was just wondering if you have ever tried it with whole wheat? I will probably try it either way but wondering if you had yet. Thanks so much! Have a fantastic day!!

    Reply
  13. Karen says

    April 18, 2017 at 7:37 pm

    5 stars
    My 11 year old daughter loves to bake and tried this recipe tonight. OMG these are one of the best rolls I’ve ever had and I will never buy rolls from the store again. Thank you !

    Reply
  14. Meneka de Silva says

    April 18, 2017 at 6:34 pm

    I just made the bread rolls came out very well, thanks
    Cheers
    Meneka de Silva

    Reply
  15. Aer says

    April 18, 2017 at 7:54 am

    4 stars
    Can i freeze the dough (for future use) without affecting any texture or consistency? I hope you could help me with my query. Thanks

    Reply
    • Nagi says

      April 18, 2017 at 10:12 am

      I haven’t tried for this no knead dough Aer, I’d love to know if you try it!

      Reply
  16. Renee' says

    April 18, 2017 at 7:07 am

    I made these for Easter, my first time ever making rolls from scratch, they turned out beautifully! My husband ate 3! Great recipe!

    Reply
    • Nagi says

      April 18, 2017 at 10:11 am

      Woah! What a compliment, these are BIG rolls! 🙂 You rocked it Renee!

      Reply
  17. Havovi says

    April 18, 2017 at 2:47 am

    5 stars
    Hi Nagi…thanks for sharing this recepie. I have never tried baking bread before but I think this looks very simple and would love to try it out. However before baking them, I want to clarify 2 things- firstly which cup should be used to measure the flour, dry cup or the measuring cup for liquids? ( I presume its the dry cup but am confused from the above comments of a gentleman). Secondly, at what temperature should it be baked on? And should the lower portion be baked first and then the top portion (as one does for cakes) ? Please clarify…thanks

    Reply
    • Nagi says

      April 18, 2017 at 9:55 am

      Hi Havovi! Definitely the dry cup 🙂 I never thought that anyone would try to use a liquid cup for measuring flour! For baking, please use the recipe temps: 200C/390F (standard ovens) or 180C/350F (fan/convection). I put all the rolls on one tray so they bake at the same time!

      Reply
  18. SandyToes says

    April 18, 2017 at 12:58 am

    You post these in April? What is wrong with you? I needed these in January! I haven’t made them yet, as it’s now officially too hot for oven baking here in Tampa, but I’ll try a small batch in my Breville countertop oven if we get a cool evening. Cross your fingers for me, because I really want these rolls!

    A couple of comments, if I may. First, I would never, ever, laugh at baby hands. I always have to watch your videos twice because the first time through, I’m just charmed by your smooth, adorable hands. Seriously, I love your hands. Second, Dozer nailed it! His expressions say everything that needs to be said about life. He is a very wise pup.

    Reply
    • Nagi says

      April 18, 2017 at 9:50 am

      BA HA HA!!! You had me for a minute there! I literally just had to deal with a horribly nasty message from someone, I thought this was going to be another!! I absolutely love that you’re thinking of trying these even though it’s SO HOT! Hope you had a fabulous Easter break Sandy 🙂 N xx

      Reply
      • Christine says

        April 19, 2017 at 10:45 pm

        Hi Nagi is there a way I could mak these rolls using gluten free flour with success?

        Reply
      • SandyToes says

        April 20, 2017 at 7:27 am

        I’m so sorry you had to deal with a nasty comment. You’re seriously one of the nicest, sweetest food bloggers on the internet. I can’t believe anyone would ever have an unkind word to say about you. XX

        Reply
        • Nagi says

          April 21, 2017 at 7:10 am

          ❤️ All food bloggers get nasty messages! Comes with the territory. 🙂 If you’re going to have an online presence, have to accept there are crazies out there!!! N xx

          Reply
  19. joy p says

    April 17, 2017 at 11:26 pm

    i am planning on making these but i wanted to know if they can be made with out using the parchment paper when baking what will happen if it is not used and should they be baked in metal or glass dish or does it not matter?

    Reply
    • Nagi says

      April 18, 2017 at 9:36 am

      Hi Joy! If you spray the pan then it will be fine 🙂 I also use paper because it makes them easier to lift out onto a cooling rack, but they can just as easily be inverted then flipped back right side up onto the rack!

      Reply
  20. Julia says

    April 17, 2017 at 2:45 pm

    5 stars
    <3<3<3<3<3 I've never been much of a baker, because after trying to make my own crusts, and never being able to get anywhere between them being far too sticky or far too flaky, I figured it just wasn't my thing. But these turned out SO GOOD! *insert Morgan Freeman saying good like in Bruce Almighty* I could just repeat, ad nauseum that they're so good, but that would just get silly after a while. What really impressed me, was that even though they turned dark on the bottom, they didn't get crunchy, or burnt. The outside of the rolls were just the right amount of crisp, and the insides were just so ooey gooey soft. These were so easy to make, that I'm going to make them quite often, and they're definitely replacing the store bought rolls or canned crescent rolls that I normally offer for Thanksgiving and Christmas dinners. A friend of mine shared this on Facebook, and I've already thanked him for doing so. Thank you SO SO SO SO much for sharing this super easy, and incredibly successful recipe. And these aren't small rolls, I tell you what. You could plop a fried egg and a sausage patty in these things, and make yourself a lovely breakfast sandwich with these bad boys. I give this recipe 6 stars, three thumbs up, and a 125% rating from rotten tomatoes!

    Reply
    • Nagi says

      April 18, 2017 at 9:31 am

      SO excited to hear that you loved these Julia!!! WHOOOT! Thank you for letting me know! N xx

      Reply
Newer Comments
Older Comments

Primary Sidebar

Hi, I'm Nagi!

I believe you can make great food with everyday ingredients even if you’re short on time and cost conscious. You just need to cook clever and get creative! Read More

Free Recipe eBooks

Join my free email list to receive THREE free cookbooks!

Meet Dozer

Official taste tester of RecipeTin Eats! Meet Dozer
As Featured On

Never miss a recipe!

Subscribe to my newsletter and receive 3 FREE ebooks!

Subscribe
Recipes
  • All Recipes
  • By Category
  • Collections
About
  • About Nagi
  • About Dozer
  • RecipeTin Meals
Related
  • RecipeTin Japan
Help
  • Contact
  • Image Use Policy
© RecipeTin Eats 2026
  • Privacy Policy & Terms
Site Credits
Maintained by Human Made Designed by Melissa Rose Design Developed by Once Coupled
All Rights Reserved

Subscribe to my newsletter

Sign up and receive 3 FREE EBOOKS!